Difference between revisions of "Nubs"
(more info on the cause of the one nubs.) |
(→Nub Disassembly: Links to Claude's post and pics.) |
||
| Line 12: | Line 12: | ||
'''This is a fairly tricky process, and will most likely ''void your warranty.''''' | '''This is a fairly tricky process, and will most likely ''void your warranty.''''' | ||
| − | You need: | + | You need[http://www.gp32x.com/board/index.php?/topic/54073-the-one-nub-club/page__view__findpost__p__874378]: |
* High quality soldering iron | * High quality soldering iron | ||
* Solder Wick | * Solder Wick | ||
| Line 27: | Line 27: | ||
[[Image:Nub_inside.jpg]] | [[Image:Nub_inside.jpg]] | ||
| − | Full sized versions of these photos can be found [http://www.flickr.com/photos/tsh2/4707661640/ here]. | + | Full sized versions of these photos can be found [http://www.flickr.com/photos/tsh2/4707661640/ here]. Original pics from [http://picasaweb.google.com/claude.schwarz/DropBox?authkey=Gv1sRgCN7KsICXu-KTzwE&feat=directlink Claude] |
Top left is the micro-joystick which serves as both a spring and the sensing element. when re-assembling this must fit perfectly into the plastic, and be perfectly clean. | Top left is the micro-joystick which serves as both a spring and the sensing element. when re-assembling this must fit perfectly into the plastic, and be perfectly clean. | ||
Revision as of 11:52, 6 July 2010
The Pandora has 2 analogue nubs, which were custom designed.
Some early units (One Nubbers) have been released with one nub not covered under warranty in order to allow people to get further up the queue. Reports [1] suggest that many of these may be reasonably functional, and problems relate to either the calibration process or dirt inside the nub. This situation was caused by the manufacturer of the nubs, who did not use strict enough tolerances when making the nubs which lead to many of the nubs being faulty.[2]
Nub Calibration
Push them up, down, left, right to the edge, then let go of them so they spring back by themselves. Ie push up, as far as it will go, then let go (it must spring back). Do that for each direction. Then do some circles. That should set them up. If you don't do this they can go wrong during that session until reset.[3]
Nub Disassembly
This is a fairly tricky process, and will most likely void your warranty.
You need[4]:
- High quality soldering iron
- Solder Wick
- Shim Blade (Edsyn RB641)
- Isopropyl Alcohol cleaner
- Size 0.00 cross-head screwdriver
Removing the nubs from the PCB is difficult. They are mounted using cut-off plated through holes butted onto pads (fairly standard SMT technology). Just using solder wick will not be sufficient, and if you are not extremely careful, you will rip the pads off the nub or the board.
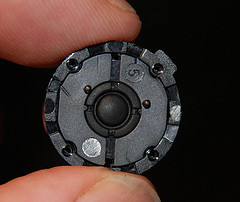
This shows the under side of the nub, which has a small PCB screwed on, and 2 locating pins.
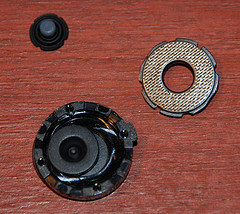
Full sized versions of these photos can be found here. Original pics from Claude
Top left is the micro-joystick which serves as both a spring and the sensing element. when re-assembling this must fit perfectly into the plastic, and be perfectly clean.
--Tsh 13:08, 17 June 2010 (MEST)

