Difference between revisions of "LEDs and backlight"
(Added photo to page) |
m (Added to Hardware category.) |
||
| Line 79: | Line 79: | ||
/usr/bin/op_test_inputs is included designed to test inputs. | /usr/bin/op_test_inputs is included designed to test inputs. | ||
| + | |||
| + | [[Category:Hardware]] | ||
Latest revision as of 21:22, 20 July 2015
Contents
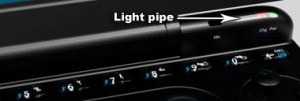
Status LEDs
Meaning of the LEDs from left to right according to gfrancisdev.
Left LED group
- SD card 1
- SD card 2
- Wifi
- Bluetooth
Right LED group
- Empty (with solder pad for hardware hackers who want to use an additional LED)
- Empty (-"-)
- Charging
- Power
These LEDs can be enabled or disabled using the LED settings script which can be launched from Menu->Settings.
Backlight
Brightness
The screen backlight power is controllable via a number of mechanisms:
- The 'sun' icon next to volume on the task bar - click it and drag the slider that appears to modify backlight power interactively
- The LCD-Settings app under Pandora menu->Settings - choose Change LCD brightness from the menu. This allows you to see the power value to be set, but doesn't change until you accept the setting and close the app
- Using the FN+u and FN+i keyboard shortcuts. This gives you quick access to screen brightness, but doesn't give you fine-grained control.
Note: For the top two methods, you can use the d-pad to change the power step by step. Up and right increase the power by 1 unit, and down or left decrease it similarly.
Power Saving
The backlight can be configured to dim to display after a period of inactivity. To set this option go to Pandora menu->Settings->LCD-Settings and choose 'Enable/disable screen blanking'.
By default this settings is disabled, since the Pandora disables the screen when the lid is closed, so unless you're in the habit of leaving your Pandora with the lid open for extended periods, this saves power and extends the lifetime of your LCD backlight by itself. Note that the lid closed settings are also configurable under Menu->Settings->Lid-Close-Settings.
Controlling LEDs and backlight programmatically
Available through LED and brightness classes:
/sys/class/leds/*
/sys/class/backlight/pandora-backlight/*
LED brightness and backlight brightness can be controlled through those files. Power and charger LEDs have variable brightness control, others are on/off only.
For example:
sudo -s 'cat /sys/class/leds/pandora::bluetooth/max_brightness > /sys/class/leds/pandora::bluetooth/brightness'
This turns the bluetooth LED on.
sudo -s 'echo 0 > /sys/class/leds/pandora::bluetooth/brightness'
This turns it off again (note the associated bluetooth hardware has not been touched here - only the LED lamp).
Note: SD card LEDs use SD cart power supplies, so those must be enabled for those LEDs to work (they are enabled when cards are inserted).
Configuration
/etc/default/leds contains the mappings between the folders (above) and the name triggers. The trigger files in each of the LED and backlight folders also map the trigger to the folder. The bluetooth LED as of SuperZaxxon 1.55 does not use the trigger system - instead it is controlled by the bluetooth script writing the appropriate values into .../pandora::bluetooth/brightness directly.
/etc/pandora/conf/brightness.state defines the default backlight brightness.
Note: the driver allows lower brightness than you can set using keyboard controls, because some units start to flicker on lowest brightness. This can be changed in /usr/pandora/scripts/op_bright.sh
backlight power saving
Controlled by X server through omapfb_drv.so, can be disabled by running
xset s off
Keyboard controls
Backlight controls, power switch and pandora button are handled by pndevmapperd which calls appropriate scripts as needed.
pndevmapperd is configured using /etc/pandora/conf/eventmap - the [keys] section maps between key names and scripts to operator those controls. The scripts generally live in /usr/pandora/scripts and operate the LEDs/backlight as well as performing any hardware startup/shutdown as required (e.g. for bluetooth and wi-fi).
/usr/bin/op_test_inputs is included designed to test inputs.
